I love the feeling of getting a package in the mail. Its so exciting! Last week we order a set of Mokonas for our Tsubasa (And later XXXHolic) cosplay. I wanted a pair that was fuzzy and soft. I found a set on EBAY and we ordered them quickly. Today I got them in the mail. They are a bit smaller than I had thought but I love them so much! Its weird with Mokonas because their height changes. Some times they seem small and others they are large. So I don't think their height really matters much.
But its the first items for our second cosplay and I'm very excited. They are both in good condition, brand new and are so soft! I have to say I'm a bit hooked on Mokona items now. I told Nic during Kumori-con I was going to take a break from getting Gloomy Bear stuff and buy every Mokona item I could find. >.<
I'm obsessed.
Soon (when Nic has time) we'll be ordering his costume as well as the Chinese shoes for the cosplay. I believe we're also getting the wigs too. So then I'll have that to look forward to. Both wigs I found are pre-styled (THANK YOU!) and are wonderfully priced so I'm very excited to see them in person. My hanfu (Sakura's costume) will be ordered last since it's more money. The best thing is that everything will be coming on time for Kumori-con. We normally order around the three-four month period so we still have to time to send them back if something goes a miss.
We won't be able to go to the cosplay picnic now but that's okay. Since the costumes wont be done until August. I'm super thrilled now. But I still have a lot of prop work to do so I better go and do that now before I get distracted again.
Update on the sphere.
The sphere wont sand down and it breaking downwards so I'm testing out a few new ways that I could make it. One is Magic Model clay with a wire base inside, coated with two-three coats of Gesso then a coat of varnish. I'm almost done with this model.
Model two will be made out of wire, glued together with hot glue and will be spray painted gold. I'm not sure how long this one will take but I'm hoping this will be stronger than the clay one.
I'm also looking into learning how to do embroidery for future handmade cosplays. I'm really loving sewing and working with thread so I'm hoping that embroidery will be even better. I have a project in mind, just a simple rose on a sweater I have so once I have my mom find her embroidery stuff I'm going to try it out and see how it goes.
Monday, June 25, 2012
Thursday, June 14, 2012
Cosplay contest? Oh yes!
I decided eary on that Kumori-con 2012 will be the con where we really reach outside our bubble and try new things. We're normally very quiet and easy going, more willing to watch then do. So this year I signed us up for a cosplay contest. It's a walk on so our costumes don't have to be hand-made by us. Instead all we do is pose and walk. I've been scanning through scans of Tsubasa and I believe I know what we're going to do. I've also been watching videos of old contests and what other walk on's have done. I think we're going to do great. We'll be nervous but this is a good way to meet some new people and really connect with the con in a different way.
We're also sharing a hotel room with some cosplay buddies. With only three months to go I'm willing to rush through summer to get to fall. I can't say I'm as excited as I should be but this helps boost up my excitement. I've been fairly depressed lately so having something to work on will be fun during the summer while we wait for Kumori-con. Cons are so refreshing. Exspecailly if your like me and have a lot of stress. Its like your free for three-four days, surrounded by friendly and creative people. Your in another world and its amazing. So I can't wait to take a break from reality to have some fun and let lose. Maybe this year I can meet some life long friends that are willing to not only cosplay but hang out outside of cons. That would be boss...
Anyway I'm tired and very sore (Got my industrial piercing a few days ago) and I have a few things I must do before I go to bed. So I'll be posting more about props tomorrow if I make enough process to type about. I've seen a spike in views lately and I'm very happy. Please keep reading and don't feel afraid to comment. I would love to hear your cosplay ideas.
Ta-Ta for now!
-Victorian
Saturday, June 2, 2012
Tsubasa props
We had finally decided on cosplaying from Tsubasa for Kumori-con 2012. Since we'll be saving money from buying these costumes instead of buying the costumes from Black Butler, I really wanted to take this project on 100%. So I'm starting with props since we all know props aren't only important but fun for photo shoots. During the process of creating the props I'll be updating. So stayed tuned.
 The two props we are working on are the red "staff" On the right and the golden ball on Sakura's lap. Of course we'll be bringing our own Mokona too. But we won't be making her. The first step in making props is coming up with a way to create them. Plan it out, whether that means drawing or simply discuss what items could make up the prop.
The first prop I'll be talking about is the "staff" Since this is the only picture I could find of the weapon I'm calling it a staff since it doesn't seem to be a sword covering. (We're cosplaying the outfits from the picture) This prop is for Nic who has decided to cosplay as Syaoran.
Items
Long wooden dowel (We found a 8 foot one at the local hardware store.)
Acrylic red paint
Varnish (Clear)
Wooden ball toppers
Golden paint
Magic model clay
So first thing we did is have the top part sawed so it reached to Nic's shoulder. Guessing by the picture that's where Syaran's should stand. Since the wood is already smooth I didn't see a point in spending three to four hours re-sanding it, so I skipped that and went right to painting. If you've used acrylic before you know its basically like plastic when it dries. (It stains too!) but when painted on wood it will need many coats because the wood absorbs it quickly. Which on a plus side means it dries quicker! At least until you put on the second coat. Now it'll start looking shiny.
We got a huge bottle of paint so I'm planning on painting at least three coats. The red color is dark in the picture so the more coats I add the better it will look. While it was drying I started on painting the wooden ball toppers gold. The round wooden balls we bought didn't have a lip under as seen in the picture so I created one out of the magic model clay we bought for the sphere. So while that dries I kept coating the staff in new coats of paint. Make sure you do one side at a time so you have a place to set it without getting red paint everywhere.
The only thing we haven't gotten for this is the red tassel. We're planning on finding that in a few weeks when we go to the mall and Asian market. We'll also been looking for a red tassel for Sakura's sphere as well.

So the "staff" is taller then me (5'2) so I'm guessing its around 5'5. The two gold toppers are on and are being fixed (hence why they are white on the base) with Gesso and then will be painted gold.

A close up of the topper. The gold ball didn't have a lip under it like the staff has in the picture so I created one out of magic model clay. Its coated in two coats of Gesso so it's firm and wont dent easily.
Moving on...
 Sakura's Sphere and feathers.
This is tricky. The sphere is hollow with a memory feather inside. It seems firm but flat with two sakura flowers on the sides. At first I wanted to find something like a round glass jar or perhaps a ball but I realized both of those will not work. How would you put the feather in? The ball is useless without the feather.
We looked for a foam ball but with a price tag of $20 I decided not waste that money and to get a plastic toy ball at a store for the mold.
Items:
Plastic ball (I use a small metal cup, like for serving fruit at parties to hold the ball in place)
Magic model clay
Wire
Gold spray paint
Paper mache materials
I started by using the wire for a base. Its firm and hard to break. So I first started by wrapping two strands of wire around the ball (careful of sharp ends, I have really cheap hot glue and I put a little dab of glue at the end to keep the points from popping the ball) This way I had a firm base to work off of. Once that was down I started creating the swirls. Once I had a few done I decided to go ahead and start wrapping the wire in the magic clay.
 This clay is mess free and is very fluffy and fun. But be warned it dries within 72 hours and is very fragile. Its meant for little kid projects. I bought it because Paperclay was $8 for very little. Magic clay is cheap and a little goes a long way with it. So after I coated it in the clay...

It looked like this. Now I'm planning on removing the ball later. the ball slips right out from under the sphere. As you can see the clay made some of the curls stick up. I decided the only way to fix that and make the clay stronger is by wrapping it in paper mache. I'm not sure if I'm going to buy a mix or make a mix of the paste myself yet. But we'll be starting on it today.
I made sure to start on the top. I'm not going to work on the bottom until the top is done and is firm. So nothing breaks while turning it over. When working with the wire I suggest having pliers with you, as well as wire cutters (My dad fixes cars so we have lots of tools) I'm planning on spray painting this since we have a can of gold shiny paint still. But if you decide to do paper mache as well be sure you use white paper. this way you can paint over it without having to use many coats.
 So this is what I have so far. Its keeping the shape quite nicely. The clay is a bit thin in some areas as seen on the right. But that will be fixed with another layer of clay. So as of now this is all I have once I start on it again and it changes
Update- 6/3/12
Today I focused on fixing cracks (Magic Model clay cracks VERY easily.) And creating a firm base so I can move on and start on fixing the curls, plus adding more. As you can see in the last picture the lines were thin and weak looking. When I woke up a lot of the lines were cracking and bad. So I quickly started to work on it, adding a thicker layer of clay.

The lines are now thicker (Its starting to look more like how the prop should) but the spirals are not staying up and the smaller ones (See front) is tilting outwards. After I left it to dry and went about my day I came back and noticed it was cracking. Not only that but it was falling off the base. I went to wash my hands and my boyfriend was spazzing. It turns out the whole thing slide off (Luckily it wasn't broken because it was fully contented yet) So I quickly made the discussion to gather everything up and start with paper macheing the boning I had created.
----
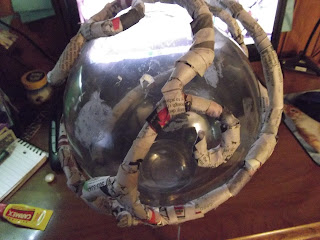
I read that home made paper mache can mold over time because of the flour in it. Since this is such a complicated prop that I'll most likely never want to make again so I grabbed a bottle of Elmer's glue and a paint brush and some newspaper. This is a cheap way of making a firm paper mache without having to stand over a pan boiling gunk that stinks like no other. The photo above is the outcome. Its not only staying in place but its firm and nothing is leaning outwards. Its still drying but I'm very pleased with how it went. All my hard work has paid off and I'm really excited to move forward to finish this piece.
I'm planning on starting on the smaller tighter curls after the piece dries. I've learned that they need to be connected to the base in order to stay in place and from falling all over the place. So the next step is starting with the wire. This time I'm going to use two lines of wire, making the base thicker and firmer. This way it'll be harder for it to fall off of the base, which is covered in paper mache. Then add the coat of clay (Thicker this time, don't be afraid of using it) then paper mache. Four steps.
1.Cut and form the wire and connect it to the base.
2.Form the clay around the wire base
3. Let dry and add a layer of varnish
4. Add paper mache layer
After these steps I'm planning on trying to spray paint but if that doesn't work I'll be hand painting the whole thing by hand. After that I'll decided how to crate the hook on the bottom to hold the tassel, which we're looking for this weekend. The feather for the prop is already done but I'll post the pictures later.
----
Yesterday I added on the last bits of swirls to the top which is now covered in paper mache and is done. I noticed because I had to take off the boning of the sphere from the base (plastic ball) it had slipped and wasn't even. So I took it off the base for good. Although I did put it back on to make sure the shape was in fact correct because its hard to tell with it being on its own. This morning I covered the newspaper with varnish so it stays hard and the bits of clay that are seen don't crack before I can put on the gesso.
Gesso was a last minute discussion to put on because of the newspaper is uneven. I got the idea from FIRELILYCOSPLAY's DA. She also used the glue and newspaper for her paper mache project. Gesso dries hard like canvas. It'll go on smooth too. Its normally used for painting but works great on projects like this. Instead of using something more expensive to create a hard and smooth surface to work with Gesso is the best choice.
I can't post the pictures today thanks to the camera being dead at the moment but I'll make sure to update them tomorrow when I can also take pictures of the staff and the feathers.
Staff-70% done
Feathers-99% done
Sphere-40%
--- 6/8
So today we got more supplies, model magic clay and Gesso. The top part of the sphere is looking good. But I noticed a issue. The newspaper used for the paper mache is sticking up in some places and looks bad with the Gesso over it. Luckily we got some paper mache pulp too. So tomorrow I plan on re paper macheing it so it's smooth. I also started creating the bottom half of the sphere. Since I have to do this in parts so the I wont have to press the top part down while working on the bottom. I'm guessing this will take a while to figure out how to get it smooth but hopefully this paper mache pulp is easy to use. Its late I'm tired as hell and I still couldn't find the camera so tomorrow while I'm waiting for the paper mache to dry I'm doing a huge clean up of my work space and room.
Tomorrow we're also going to start our search for red tassels for both of the props. I hope we can find some!

---6/10
So still looking for that camera....Anyway The sphere is on hold until we have a full day to start the paper mache I think I'll do it tomorrow since I'm not doing anything after I go to the job center. We decided after not being able to find red tassels for both the props that I'll be making those as well. We also plan on entering both the sphere and staff into a prop contest in Dec. I'm pretty pumped for that since these are my first fully made props. I'm pretty proud of them. I'll post the pictures as soon as I can. I also got my ear pierced (Industrial) yesterday so I'm in a bit of pain and kind of wozy so work will be slow right now. We're planning on going to a cosplay picnic in July so hopefully I'll have the props done by then! I'll update tomorrow with pictures (If I find that blasted camera!)
 So this is the after math of using the paper mache pulp. Its staying in shape although it doesn't look that way in the picture. And is pretty firm. I tested it and the paper mache is able to be sanded. So after I sand it all down I'm hoping it'll be smooth enough for me to paint. Although who knows how long that'll take.

The first prop I'll be talking about is the "staff" Since this is the only picture I could find of the weapon I'm calling it a staff since it doesn't seem to be a sword covering. (We're cosplaying the outfits from the picture) This prop is for Nic who has decided to cosplay as Syaoran.
Items
Long wooden dowel (We found a 8 foot one at the local hardware store.)
Acrylic red paint
Varnish (Clear)
Wooden ball toppers
Golden paint
Magic model clay
So first thing we did is have the top part sawed so it reached to Nic's shoulder. Guessing by the picture that's where Syaran's should stand. Since the wood is already smooth I didn't see a point in spending three to four hours re-sanding it, so I skipped that and went right to painting. If you've used acrylic before you know its basically like plastic when it dries. (It stains too!) but when painted on wood it will need many coats because the wood absorbs it quickly. Which on a plus side means it dries quicker! At least until you put on the second coat. Now it'll start looking shiny.
We got a huge bottle of paint so I'm planning on painting at least three coats. The red color is dark in the picture so the more coats I add the better it will look. While it was drying I started on painting the wooden ball toppers gold. The round wooden balls we bought didn't have a lip under as seen in the picture so I created one out of the magic model clay we bought for the sphere. So while that dries I kept coating the staff in new coats of paint. Make sure you do one side at a time so you have a place to set it without getting red paint everywhere.
The only thing we haven't gotten for this is the red tassel. We're planning on finding that in a few weeks when we go to the mall and Asian market. We'll also been looking for a red tassel for Sakura's sphere as well.

So the "staff" is taller then me (5'2) so I'm guessing its around 5'5. The two gold toppers are on and are being fixed (hence why they are white on the base) with Gesso and then will be painted gold.

A close up of the topper. The gold ball didn't have a lip under it like the staff has in the picture so I created one out of magic model clay. Its coated in two coats of Gesso so it's firm and wont dent easily.
Moving on...
Sakura's Sphere and feathers.This is tricky. The sphere is hollow with a memory feather inside. It seems firm but flat with two sakura flowers on the sides. At first I wanted to find something like a round glass jar or perhaps a ball but I realized both of those will not work. How would you put the feather in? The ball is useless without the feather.
We looked for a foam ball but with a price tag of $20 I decided not waste that money and to get a plastic toy ball at a store for the mold.
Items:
Plastic ball (I use a small metal cup, like for serving fruit at parties to hold the ball in place)
Magic model clay
Wire
Gold spray paint
Paper mache materials
I started by using the wire for a base. Its firm and hard to break. So I first started by wrapping two strands of wire around the ball (careful of sharp ends, I have really cheap hot glue and I put a little dab of glue at the end to keep the points from popping the ball) This way I had a firm base to work off of. Once that was down I started creating the swirls. Once I had a few done I decided to go ahead and start wrapping the wire in the magic clay.


It looked like this. Now I'm planning on removing the ball later. the ball slips right out from under the sphere. As you can see the clay made some of the curls stick up. I decided the only way to fix that and make the clay stronger is by wrapping it in paper mache. I'm not sure if I'm going to buy a mix or make a mix of the paste myself yet. But we'll be starting on it today.
I made sure to start on the top. I'm not going to work on the bottom until the top is done and is firm. So nothing breaks while turning it over. When working with the wire I suggest having pliers with you, as well as wire cutters (My dad fixes cars so we have lots of tools) I'm planning on spray painting this since we have a can of gold shiny paint still. But if you decide to do paper mache as well be sure you use white paper. this way you can paint over it without having to use many coats.

Update- 6/3/12
Today I focused on fixing cracks (Magic Model clay cracks VERY easily.) And creating a firm base so I can move on and start on fixing the curls, plus adding more. As you can see in the last picture the lines were thin and weak looking. When I woke up a lot of the lines were cracking and bad. So I quickly started to work on it, adding a thicker layer of clay.

The lines are now thicker (Its starting to look more like how the prop should) but the spirals are not staying up and the smaller ones (See front) is tilting outwards. After I left it to dry and went about my day I came back and noticed it was cracking. Not only that but it was falling off the base. I went to wash my hands and my boyfriend was spazzing. It turns out the whole thing slide off (Luckily it wasn't broken because it was fully contented yet) So I quickly made the discussion to gather everything up and start with paper macheing the boning I had created.

----
I read that home made paper mache can mold over time because of the flour in it. Since this is such a complicated prop that I'll most likely never want to make again so I grabbed a bottle of Elmer's glue and a paint brush and some newspaper. This is a cheap way of making a firm paper mache without having to stand over a pan boiling gunk that stinks like no other. The photo above is the outcome. Its not only staying in place but its firm and nothing is leaning outwards. Its still drying but I'm very pleased with how it went. All my hard work has paid off and I'm really excited to move forward to finish this piece.
I'm planning on starting on the smaller tighter curls after the piece dries. I've learned that they need to be connected to the base in order to stay in place and from falling all over the place. So the next step is starting with the wire. This time I'm going to use two lines of wire, making the base thicker and firmer. This way it'll be harder for it to fall off of the base, which is covered in paper mache. Then add the coat of clay (Thicker this time, don't be afraid of using it) then paper mache. Four steps.
1.Cut and form the wire and connect it to the base.
2.Form the clay around the wire base
3. Let dry and add a layer of varnish
4. Add paper mache layer
After these steps I'm planning on trying to spray paint but if that doesn't work I'll be hand painting the whole thing by hand. After that I'll decided how to crate the hook on the bottom to hold the tassel, which we're looking for this weekend. The feather for the prop is already done but I'll post the pictures later.
----
Yesterday I added on the last bits of swirls to the top which is now covered in paper mache and is done. I noticed because I had to take off the boning of the sphere from the base (plastic ball) it had slipped and wasn't even. So I took it off the base for good. Although I did put it back on to make sure the shape was in fact correct because its hard to tell with it being on its own. This morning I covered the newspaper with varnish so it stays hard and the bits of clay that are seen don't crack before I can put on the gesso.
Gesso was a last minute discussion to put on because of the newspaper is uneven. I got the idea from FIRELILYCOSPLAY's DA. She also used the glue and newspaper for her paper mache project. Gesso dries hard like canvas. It'll go on smooth too. Its normally used for painting but works great on projects like this. Instead of using something more expensive to create a hard and smooth surface to work with Gesso is the best choice.
I can't post the pictures today thanks to the camera being dead at the moment but I'll make sure to update them tomorrow when I can also take pictures of the staff and the feathers.
Staff-70% done
Feathers-99% done
Sphere-40%
--- 6/8
So today we got more supplies, model magic clay and Gesso. The top part of the sphere is looking good. But I noticed a issue. The newspaper used for the paper mache is sticking up in some places and looks bad with the Gesso over it. Luckily we got some paper mache pulp too. So tomorrow I plan on re paper macheing it so it's smooth. I also started creating the bottom half of the sphere. Since I have to do this in parts so the I wont have to press the top part down while working on the bottom. I'm guessing this will take a while to figure out how to get it smooth but hopefully this paper mache pulp is easy to use. Its late I'm tired as hell and I still couldn't find the camera so tomorrow while I'm waiting for the paper mache to dry I'm doing a huge clean up of my work space and room.
Tomorrow we're also going to start our search for red tassels for both of the props. I hope we can find some!

---6/10
So still looking for that camera....Anyway The sphere is on hold until we have a full day to start the paper mache I think I'll do it tomorrow since I'm not doing anything after I go to the job center. We decided after not being able to find red tassels for both the props that I'll be making those as well. We also plan on entering both the sphere and staff into a prop contest in Dec. I'm pretty pumped for that since these are my first fully made props. I'm pretty proud of them. I'll post the pictures as soon as I can. I also got my ear pierced (Industrial) yesterday so I'm in a bit of pain and kind of wozy so work will be slow right now. We're planning on going to a cosplay picnic in July so hopefully I'll have the props done by then! I'll update tomorrow with pictures (If I find that blasted camera!)

Wednesday, May 30, 2012
UnderTaker VS Sakura?
Ever since I started reading Tsubasa I've fallen back in love with Sakura's character. It doesn't help she has awesome outfits. Its sort of making me want to cosplay Tsubasa instead of Black Butler. So I'm going to list some pros and cons to each outfit before we buy anything.
First up Black Butler

Grell pro UnderTaker Pro
High energy character Creepy and fun
Fabulous! Well known/well liked
Comfortable outfit Comfortable outfit (PANTS!!!)
Famous anime/manga Excuse to stalk every Ciel I see
Well liked and well known
Cons (For both)
Long wigs, easy tangle!
Long coats(Could be hot out)
Lots of make/effects (Grell's teeth, Undertaker's scar)
High heeled shoes
Heavy, big props
Tsubasa

Syaoran pro Sakura pro
Strong, kick ass character Amazing, drop dead beautiful outfit
Quiet personality (Suits Nic) Short wig!!!
No contacts needed, brown eyes Unique outfit, popular character
Unique outfit (Not a lot will be wearing it) Cool and flowy (Good for warm weather)
Non heeled shoes Is a princess ;)
Short wig No heels on shoes (Chinese flat slippers)
Light make-up for both
Cons (For both)
Another long dress (Could get dirty, stepped on, heavy to wear)
Lots of white/light colors could get stained
Large, hard to make props
I'm stuck between both. I mean it would be awesome to do both of them but we can't in less I get a job soon. We'd save a lot of money by doing Tsubasa and have a better chance at getting the outfits done correctly. But I'm not sure. Both characters are awesome....but I'm really split between them.
Wednesday, May 23, 2012
Dream cosplays (picture heavy)
Every cosplayer has a dream cosplay. Whether they are just starting out or are a pro. There is always that character, the outfit you dream of creating. To prance around in. For me I grew up with this character and always thought she was so lovely and strong, like a true queen should be. (Why do I always pick royal characters?) I loved this movie when I was younger. Most of other kids my age didn't know about it. But it was my favorite. A true gem along movies. especially for someone who had little interest in Disney princesses.
The movie?

Remember it? Most likely not but its my favorite movie of all time. Besides Mirrormask and The Secret of Moonacre. This movie (even today) leaves me inspired. The characters, the actors, the costumes, the music and of course, the yellow brick road is wonderful.


The movie?
Remember it? Most likely not but its my favorite movie of all time. Besides Mirrormask and The Secret of Moonacre. This movie (even today) leaves me inspired. The characters, the actors, the costumes, the music and of course, the yellow brick road is wonderful.


This movie was so colorful, so exciting and thrilling. They really did a good job on it. But who is this character who claims the title of my dream cosplay? Oh did you have to ask?

That's right. Her royal highness, Ozma herself. This girl is my dream character to cosplay. Of course I want this to be a costume I make all by myself so I enter it in costume contests at every con I go to. Since I'm realizing I'm a bit of a perfectionist like most cosplayers tend to become I'll take my time with this, hoping this will be made some day. But until then, here are some more picture of the Ozma the great!


The outfit will consist of one very long light green gown with slit Russian style sleeves (I call them Russian style because that style was very popular during Imperial Russia. And are on the Anastasia gown I plan on making some day) The torso of the gown will be made of a slightly darker green covered in a light, flowy, see through green fabric. The necklace will be decorated in all sorts of green and white and seer pieces, and yes, lots of feathers. It looks to be at least four flowers on the neckline but I could be wrong. The waist is defined by green ribbon in which starts the long flowy skirt of the gown. The arms also have gold chains hanging from the top and down the arm. These seem to have green beads as well.
The skirt seems to be layered. The first layer is short then shows the layer under which hides her feet and ruby slippers. The second layer is also a train that flows behind her. There is a lot of beading on the gown near the waist so I'll be trying to bead them on myself. I'll also be making the famous head piece. Two flowers with the golden OZ. I love this headpiece and I have a feeling I'll refuse to remove it.
Feel free to share your dream cosplay in the comments below. I would love to see your ideas!
Wednesday, May 16, 2012
Grell+Undertaker cosplay math
GRELL (Nic)
Wig+Glasses Price (Plus shipping) 33.98
Outfit Total (Plus shipping) 115.95
Shoes
Red/black -52.12
Grand Total- 202.05
UNDERTAKER (Jess)
Outfit+Wig set Price (plus shipping) $188
Shoes
shoe
$35.99 (Shipping included)
Grand Total- 223.99
Props/make-up
SKull :D
Rigid-Collodion-Scarring-Liquid
Wig+Glasses Price (Plus shipping) 33.98
Outfit Total (Plus shipping) 115.95
Shoes
Red/black -52.12
Grand Total- 202.05
UNDERTAKER (Jess)
Outfit+Wig set Price (plus shipping) $188
Shoes
shoe
$35.99 (Shipping included)
Grand Total- 223.99
Props/make-up
SKull :D
Rigid-Collodion-Scarring-Liquid
Thursday, May 10, 2012
First hand-made cosplay choices
So I finally settled on two choices for my first hand-made cosplay. This will be my third cosplay. It may not be made right away but at least I have a plan all set up. :D
So for my first choice is the famous yellow ball gown seen in Anastasia (the FOX movie)

Ever since I was young I flipping loved this dress. It was much better than the dream version. Plus not only does it look like the dresses the older Romanov sisters wore in real life but has many true Russian elements to it. (See below)


If you didn't know these woman did in fact exist. Until they and their loving family was horribly murdered (shot and stabbed to death)
The dress in the movie has many elements taken from the real Anastasia's two older sisters, Olga and Tatiana. These dresses were worn for their family's 300 anniversary party. The two younger girls (Anastasia and Marie) both had similar dresses made but did not go to the party. Theirs' were short as they were not yet sixteen (The age where the length of skirts were past their ankles as a sign of maturity.)
I've been dreaming of having this dress since I was little, so why not just make it? I'm going to. I just need to find a few patterns so it wont be such a headache since I'm still new at sewing. I also plan on making the lovely crown she is seen wearing which is also a traditional Russian style crown for woman.
 This is the one the movie has based its copy off of. Lovely isn't it?
The next choice is from a anime. "Alice" version of Esther from Trinity Blood.

Trinity Blood is one of my favorite mangas. This one would be fun not only to wear but my hubby could easily get his chance to finally be Abel (The person in the watch) Plus I could get him to wear bunny ears like pictured. Esther is in the middle as Alice.
 (Scan colored by me)
This dress is a simple long sleeved (with cuffs) blue dress with white apron with large fluffy petticoat under. The boots are what makes me really want to cosplay this because I just so happened to have found a pair that look very similar at a thrift store a few years back! I was also going to use them for a Dinah (Bizenghast) cosplay but I cannot yet afford to buy that one.
This dress will most likely be created before the one as mention above. It's simple and easy and it would require less work/fabric/time to create. I'm guessing it will be created before Sakura-con 2013 but we'll see. Maybe I'll be able to make both by then!
So for my first choice is the famous yellow ball gown seen in Anastasia (the FOX movie)

Ever since I was young I flipping loved this dress. It was much better than the dream version. Plus not only does it look like the dresses the older Romanov sisters wore in real life but has many true Russian elements to it. (See below)


If you didn't know these woman did in fact exist. Until they and their loving family was horribly murdered (shot and stabbed to death)
The dress in the movie has many elements taken from the real Anastasia's two older sisters, Olga and Tatiana. These dresses were worn for their family's 300 anniversary party. The two younger girls (Anastasia and Marie) both had similar dresses made but did not go to the party. Theirs' were short as they were not yet sixteen (The age where the length of skirts were past their ankles as a sign of maturity.)
I've been dreaming of having this dress since I was little, so why not just make it? I'm going to. I just need to find a few patterns so it wont be such a headache since I'm still new at sewing. I also plan on making the lovely crown she is seen wearing which is also a traditional Russian style crown for woman.
The next choice is from a anime. "Alice" version of Esther from Trinity Blood.

Trinity Blood is one of my favorite mangas. This one would be fun not only to wear but my hubby could easily get his chance to finally be Abel (The person in the watch) Plus I could get him to wear bunny ears like pictured. Esther is in the middle as Alice.

This dress is a simple long sleeved (with cuffs) blue dress with white apron with large fluffy petticoat under. The boots are what makes me really want to cosplay this because I just so happened to have found a pair that look very similar at a thrift store a few years back! I was also going to use them for a Dinah (Bizenghast) cosplay but I cannot yet afford to buy that one.
This dress will most likely be created before the one as mention above. It's simple and easy and it would require less work/fabric/time to create. I'm guessing it will be created before Sakura-con 2013 but we'll see. Maybe I'll be able to make both by then!
Subscribe to:
Posts (Atom)